
Welcome to Photoshop Makeovers. Have you ever wondered how magazines manage to get the perfect image of models? The answer is they don’t! Almost every image in glamour/fashion magazines have been digitally enhanced to gain flawless perfection. This can be spotted in some magazines where the image has been worked on so much that it gives a china doll effect, leaving almost no natural beauty of the original subject.
It’s said that digital editors spend there time trolling through each others digital work, trying to spot the enhancements.
But remember, if done correctly can retain original features and give an excellent result. Some of the techniques used involve removal of blemishes, moles, scares, wrinkles, change of hair colour, eye colour, skin tone, proportions and much more.
Please do remember this is a guide to Photoshop makeovers, using different tools and effects to gain magazine quality images. Photoshopmakeovers.blogspot.com is not trying to define what true beauty should look like in any sense. True beauty can not be gained through graphically enhanced images.
Below you will find an image of the original model alongside the exact same image but with digitally enhanced features. Although you can digitally makeover amateur photos by removing blemishes, and making small changes to eyes, lips, skin tones, you won’t be able to achieve the same standard as magazine images. This is because work has gone into the image before being digitally retouched, using chroma screens, professional cameras and many other tricks.
BEFORE: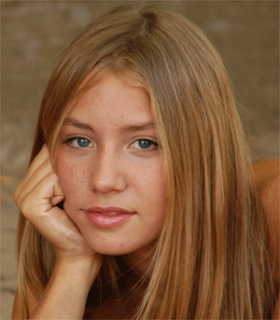 AFTER:
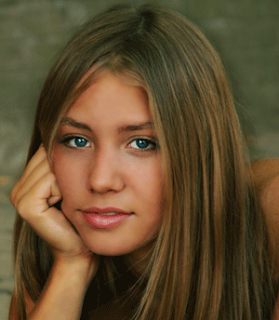
It’s said that digital editors spend there time trolling through each others digital work, trying to spot the enhancements.
But remember, if done correctly can retain original features and give an excellent result. Some of the techniques used involve removal of blemishes, moles, scares, wrinkles, change of hair colour, eye colour, skin tone, proportions and much more.
Please do remember this is a guide to Photoshop makeovers, using different tools and effects to gain magazine quality images. Photoshopmakeovers.blogspot.com is not trying to define what true beauty should look like in any sense. True beauty can not be gained through graphically enhanced images.
Below you will find an image of the original model alongside the exact same image but with digitally enhanced features. Although you can digitally makeover amateur photos by removing blemishes, and making small changes to eyes, lips, skin tones, you won’t be able to achieve the same standard as magazine images. This is because work has gone into the image before being digitally retouched, using chroma screens, professional cameras and many other tricks.
BEFORE:
AFTER:  AFTER:
 BEFORE:
 AFTER:


